Wednesday 21 December 2016

The Lilli~rain collection


Hi friends,
hope you are well!

Today I'm sharing my new jewellery collection.

The Lilli~rain collection is composed of 
beautiful magical~fantasy and contemporary
timeless pieces, made using the finest
quality semi~precious gemstone beads, Swarovski
crystals and Tibetian silver. 

It is also named after my amazing daughter, 
 who is such a huge inspiration to me. 
She is such a compassionate, and thoughtful
young woman, who never tires of wanting to help
others and making a difference in this world. 


'Unicorns and rainbows'

Perfect for any Unicorn Princess!

Stunning mystical Unicorn stretch bracelet,
made using dreamy rainbow and gold stardust beads,
with indulgent champagne Swarovski crystals and
a silver plated Unicorn charm.  


'Mermaid wishes'

Time to dive into tropical lagoon waters!
This magical mermaid bracelet is made using 
faceted cornflower blue and sky blue 
Swarovski crystal beads and high-quality blue marbled
glass beads and a silver plated mermaid charm. 


'Moonbeams and daydreams'

This delightful stretch bracelet has been made 
using beautiful round and faceted Opalite moonstone, 
Tibetan silver Angel wing spacers and 
a Tibetan silver Angel wing charm.


Buddha charm bracelet 

Made using earth tone Czech beads, 
gold stardust beads, gold tone Tibetan spacers
and a delightful bronze tone Tibetan Buddha charm.

Czech beads are handmade in home workshops 
in the Czech republic. 


Perfect for Unicorn Queens! 

Made using beautiful light pink and aurora borealis 
Swarovski crystal beads, Tibetan silver 
hanger bead and a silver plated 
Unicorn charm.  


'Angels are near'

Made using semi~precious purple jade,
clear Swarovski spacer beads, Tibetan silver hanger bead, 
Angel wing charm and a light purple 
crystal encrusted charm bead. 


Semi~precious white jade and snowflake obsidian
beaded stretch bracelet with
gold tone Tibetan Buddha charm.


Buddha charm bracelet 

Made using semi~precious white jade, 
crackled agate and grey dragons vein agate beads,
with bronze tone Tibetan silver spacers and Buddha charm. 


'Walking on the moon'

These luminous Opalite moonstone beads are 
surrounded by clear Swarovski crystals and 
silver plated Swarovski spacer beads.
Perfect for owning a little piece of the moon! 


    'Unicorn dreams'
  Magical purple dragons vein agate 
  and dreamy faceted Opalite moonstone beads.
 When the light hits this little beauty it's
 like wearing the moon on your wrist! 


'Pirates treasure'

Beautiful gold tone skull bracelet,
made using semi~precious 
grey dragons vein agate,
gold tone Tibetan spacers and 
gold-tone skull charm beads.


'I rock pink'!

Made using semi~precious purple alexandrite, 
purple jade, light pink and clear 
Swarovski crystal beads and a 
beautiful crystal encrusted charm. 


Thursday 15 December 2016

Design team December challenge


Hi friends,
hope you are well!

Here is my design team creation for Life in a snapshot 
December challenge.


Here is Decembers mood board.


I wanted to use colours like the sunset pictured above,
so I have used these beautiful papers by TNco.

This beautiful victorian Angel image was perfect 
for creating a dreamy shabby chic look.

I have also used Mocca and Latte colours,
 these ribbons and laces were from my own craft stash.


I really hope you like my vintage tag?!

Thanks once again for stopping by my blog,

please feel free to leave a comment, it would be lovely 
to hear from you. 

Hugs
 Zowie xx


Wednesday 16 November 2016

Gingerbread House Christmas cards.


Hi again crafty friends,

I'm really in the festive mood and can't wait until Christmas!

I want to put up my tree, but fear it may be
a little too early! I just love the twinkling of fairy lights 
on dark and warm, cozy nights, curled up with 
a hot cup of drinking chocolate with plenty of whipped 
cream and mini marshmallows.

 My tree is a wonderful bronze colour and i have red and gold 
decorations, Angels, Harps and stars which are all 
glitzy and sparkly gold.


My daughter loves gingerbread men, so I was really excited  
to use this wonderful Spellbinders gingerbread house die.

It's so cute and now has become one of my favourite dies.

I also bought these delightful wooden shapes from 
the Range, it's a shop we have in the uk, probably 
very similar to Michaels in the U.S.A


This card has been made for my youngest son, as he loves anything cute,
and I know that this wooden Reindeer face will be adored!


I wanted to keep with the same colour theme
of brown and red for each card.

I have made them all 3D by die cutting the main house shape 
and I created a hidden folded tab at the top of the card to hold 
the two pieces of card together. 


This third card has been made for my oldest son and 
a wooden stocking has been hung on the doorframe. 

I have used a lot of Xmas red stickles glitter glue on the cards
to give them all sparkly accents. 


I have had so much fun making these, 
'hope you like them too? 

Thanks for stopping by

Hugs
Zowie xx


Roll up, Roll up! The Circus has come to town!


Hi friends
hope you are well! 

I've been so busy crafting over the last couple of days.

I wanted to make something with a Circus theme, 
so I have created these little beauties!


This altered art tag has been made using 
a Tim Holtz Ray layering stencil,
Broken China, Aged Mahogany and Wild Honey distress inks.


I have also used a variety of stamps to create the background,
once everything was dry I adhered this wonderful
image of an elephant that i found in a book at home.
Finally, I added a couple of acrylic gem stars in matching colours. 


For this tag I have used the same process, but added
some torn pieces of scrapbook paper to the edges 
of the tag, to give a collage effect.

Next, I adhered this image and 
then I stamped the word 'applause' and 'strong man'
and added some yellow stars to complete the look. 


I really hope that you like them? if you would like to stop by 
and leave a comment, it would be so lovely to hear from you!


Hugs
Zowie xx


Saturday 5 November 2016

DT project - Life in a snapshot challenge November 2016


Hi friends,
hope you are well!

Here is my DT project for Life in a snapshot design team 
November challenge.
I wanted to create a Christmas card this time.

I have used a pre-scored Kraft card and this
wonderful vintage Christmas paper by a company called TNco. 

They design such beautiful paper collections. 

Both sheets of paper have been distressed using the blade of 
my scissors and Tim Holtz vintage photo distress ink. 


November challenge sketch.


Here I have used these beautiful stamps by Crafty Individuals, which 
I stamped onto watercolour cardstock using jet black Stazon ink.

I coloured the images using Aged mahogany, Crushed olive
and Vintage photo distress markers with a paintbrush and water. 

Once dry, I then layered them onto single squares of 
Kraft cardstock. Next, I adhered those onto the card itself.

Finally, I used a border of coordinating paper and adhered that 
in between the stamped images. I also made a bow using 
the same paper and added a single red crystal gem into the centre
to give it a little bit of Christmas bling!


If you would like to join in with the challenge and for a chance to win
a mystery prize from Things to alter, please click on the
 link below or you can find the challenge over at
facebook; Life in a snapshot.

http://whatkatiedid2.blogspot.co.uk/2016/11/life-in-snapshot-november-challenge-no-2.html?spref=fb


Thanks once again for stopping by

Hugs
 Zowie xx


Friday 4 November 2016

Altered art; artist trading cards


Hi friends,
hope you are well!

Today I am sharing with you, my altered art artist trading cards.

When i first started crafting, many moons ago, it was scrapbook
 pages and tags that i mainly created.

It's been so lovely getting back into making tags and
artist trading cards.


This atc (artist trading card) I have named
'Her magical wings gave her the courage to fly'

I have used a mixture of vintage paper to create
a collage effect. The beautiful mermaid image had been
hanging around for some time doing nothing, so
I had to show off her beauty somehow!

Once everything was adhered to the card stock base,
I added some appropriate words, from an old book.

Next, i added some sparkly cabochons which i outlined
with a vintage photo distress marker.

I'm really pleased with how the project has turned out.


'Betty had many sweethearts'


For this atc, I have used some blue looking vintage paper
and distressed the edges with broken china distress ink.

Next, I used picked raspberry and broken china distress ink
with a bubble layering stencil by Tim Holtz to achieve the background.


I then used a music note and sewing stamp around
the edges of the atc.

Finally,  I fussy cut out this wonderful image and adhered that and
some torn paper to complete the look.

I have also added some glitzy silver cabochons.

The inspiration for this atc
came from my very own
retro tattoos!


'Apparently Mona Lisa was very professional'!


I created this using a printed luggage tag from my
own craft stash.

I have used this image of the Mona Lisa before in
another one of my projects and love it so much,
so had to use it again!

I adhered the image and some words from an old book
onto the tag. Next, I stamped a crown using one of
my own stamps and adhered that onto the top of her head.
I also used platinum stickles to give the crown some added sparkle.

To complete the tag, I stamped the word 'fabulous' onto a
separate piece of white card and altered the colour
using Wild honey distress ink,
which I adhered to the bottom of the tag.
 Finally, I added some sparkly red hearts.


I really hope you like these altered art projects?

Please feel free to leave a comment and to follow my blog,
it would be very much appreciated.


Hugs
 Zowie xx


Thursday 20 October 2016


Hi friends,
hope you are well

Today I'm sharing a card made from the Santoro
 Gorjuss Girls paper collection.
This side-board easel card was so easy to make!

Here I have adhered co-ordinating paper to the three panels
that make up the whole card.

Next, I made a smaller panel to create a
stopper to hold the easel part
of the card upright.


Here, I have added large grey metallic pearls to
this side of the card and added a butterfly
embellishment, using pop-dots
to give it some added dimension. 


Thanks once again for stopping by

Hugs
 Zowie xx

Tuesday 18 October 2016

Halloween treat holders


Hi friends, 
hope you are well!

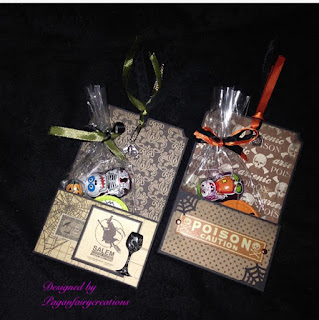
Here are some more Halloween projects that
I've been working on.

They are spooky treat holders, which are packed full of sweet treats!
Perfect for giving out to trick or treaters or 
for someone special.


All of these treat holders have been made 
using black card stock,
Which I cut into a large tag size.


I used an Xcut corner punch on both sides
and adhered these spook-a-liscious papers
from the Carta bella 'All Hallows Eve
paper range. I then made a pocket from
black card and adhered that to the bottom of the tag.


   At the top of the tags I punched a hole using
    my green crop-o-dile, then tied different 
    coloured ribbons through it. I also attached
    silver charms to these.

  On these two tags I have adhered a skull 
  cameo from Jolee's Boutique. The numbers
  are from the Tim Holtz gothic Boo die. 
  which i applied black diamond stickles to. 


These two tags are made in exactly the same way,
the papers are from the same designer range.
Here I have used some cut outs from the lost
and found collection and the spider webs were
cut from a Martha Stewart punch. I have also
used brads to attach the caution sign.


Finally, I bought some spooky candy and wrapped 
them in cello bags, which have been tied with matching ribbon.       
   

Thanks for stopping by,
Happy Hauntings!

Zowie xx


Spooky Halloween altered frame


 Hi friends,
hope you are well!

I can't believe that Halloween will soon be upon us.
I don't know about you, but to me, this year seems to have flown by?


My daughter is a huge fan of Halloween, in fact, it's her favourite
time of year apart from Christmas!

I wanted to make Lilli something spooky, so when i saw this photo frame
it was perfect!


The lenticular photo is super cool 


Here I have made my own flowers using a flower punch and
 red card stock. The larger flower has been made
using the Tim Holtz tattered florals die.

First, I adhered two black luxury feathers to the left side of the
frame and then adhered the spray 
of flowers on top of them. 
I also added grey flat back pearls to the centre
of each red flower.

Next, I cut out a Halloween sentiment from the one of 
the pages from the 'My minds eye lost and found'
Halloween paper collection.

The snake goblet is from Jolee's Boutique.

Lastly, I adhered two black pearls onto the top right and 
bottom of the frame. 

Thanks once again for stopping by.

Happy Hauntings!

Zowie xx


Saturday 8 October 2016

Shabby Chic card


Hi friends,
Hope you are well!

Today I'm sharing another shabby chic card 
that I recently made.

As you probably know by now, i adore anything shabby chic and vintage!

I just love these gorgeous papers by Lemoncraft
they are so dreamy and romantic.

Here I have used a blank white card and I adhered 
a sheet of designer vintage script paper 
from my own craft stash.

Next, i used a sheet of paper from the 'house of roses' collection
and adhered it to the centre of the card.

Then i used half a sheet of 6x6 paper from the same collection 
and adhered it to the right hand side of the card
to create a layering effect.

I then used a small strip of matching paper and adhered 
it to the bottom of the card, 
All papers have been distressed using the edge of 
my scissors and Vintage photo distress ink. 


Here i have used an image of a vintage lady from
the Maja Design vintage autumn basics paper collection,
which i then framed using a wooden frame from my own stash.

I then adhered that onto the centre of the card.

Next, I adhered mulberry paper roses, pink pearls and a delightful wooden
 birdhouse, which i painted with white gesso.

The butterflies have been fussy cut and sprinkled
with Pinflair ice diamond.


Thanks once again for stopping by 
to take a look at my blog,
It really does mean a lot to me and
is much appreciated.

Hugs
  Zowie xx


Sunday 2 October 2016

Life in a snapshot design team challenge


Hi friends,
hope you are well!
I have some super exciting news to share with you all!
I have been chosen to be a part of the wonderful Life in a snapshot design team 
and I am so very honoured.


Here is a picture of the sketch that I had to work towards.


Here is my first layout that i have designed, I wanted to give it a vintage feel,
so I have used a variety of Tim Holtz papers to create a collage.

The papers are from the collage paper stash and they are wonderfully grungy and vintage.


Here i have used a photo of the Mona Lisa 
which i adhered onto the main sheet to act as a focal point.
I then stamped the word smile using some letter stamps from my own stash 
onto some kraft card stock and then i used glossy accents
to give them some added interest. 


I have loved making this layout
hope you like it too?! 
I would love to know what you think, so if you'd like to leave
 a comment, it would be very welcome.

Thanks for stopping by to take a look,

Hugs
Zowie x


If you would like to take part in the October challenge
please click the link bellow.